How to run your first RFID spot check

To run an RFID spot check you scope it to an area, dispatch it to a handheld, walk the area with the scan running, and reconcile what came back against what your registry expected to be there. On one aisle the walking part is over in minutes, which is the whole appeal.
The part worth preparing for is the result. A first count does not really measure your inventory. It measures your asset records, your tag placement and your assumptions about where things live, all at once, and hands the disagreement back as a single percentage. Treat that number as an audit of the setup you just finished building and the first count earns its afternoon. Treat it as a stocktake and you will spend the following week chasing items that were never lost.
What a spot check compares
Two lists, and everything else is arithmetic on them.
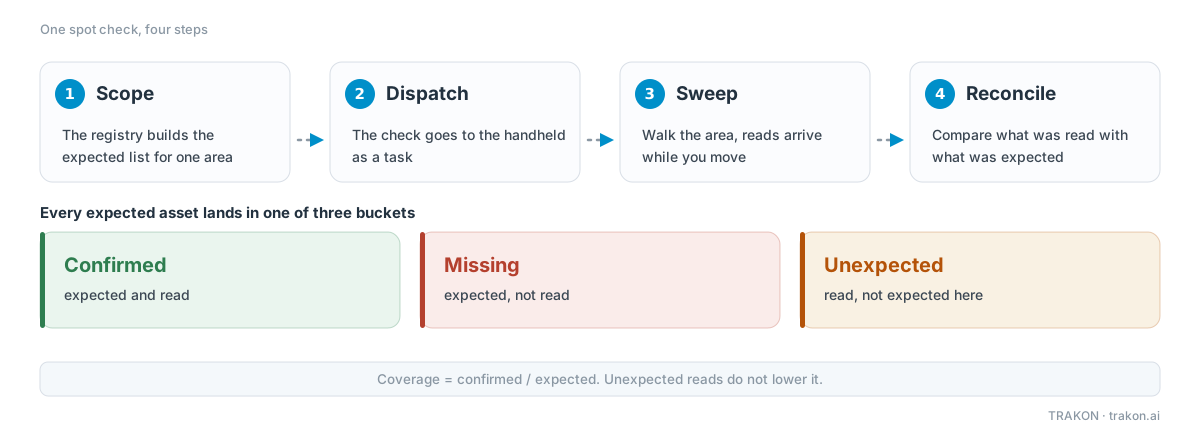
The expected list comes from your registry: every asset whose record places it inside the scope you chose. The scanned list is every EPC the handheld heard while you walked. Compare them and each asset falls into one of three buckets:
- Confirmed, expected and read.
- Missing, expected and not read.
- Unexpected, read here but not expected here, including tags with no asset record at all.
Coverage is the share of the expected list that came back confirmed. Unexpected reads do not lower it. That is a deliberate choice: a tag you did not expect is information about your building, not a failure to count.
Before you press start
Three things decide whether the result means anything, and all three are cheaper to fix before the walk than after it.
The registry has to say where things live. Scope is built from location, so an asset whose record carries no location, or one that has not been touched since somebody moved the rack, is missing before you begin. Assets can be brought in with the bulk import on the Assets page, and the hour spent cleaning that list before you import it is the highest return hour in the project.
The tags have to be bound, and bound to the right record. In Count Basic an asset is created first and its tag bound second, usually by placing it on the AZD-R1 desktop reader so the EPC fills in by itself, or by printing and binding the label in one job on a Zebra RFID printer. Anything you stuck on a shelf but never bound will come back as unexpected, which is the system telling you the truth in a way that is easy to misread as an error.
The scope has to be an area you can actually walk. Locations are a hierarchy, building down to floor, zone, shelf, rack and bin, and a first check should sit low in it: one aisle, one store room, one cage. Scoping the whole warehouse on day one produces a spreadsheet nobody can act on. Scoping one aisle produces a question you can answer before you go home.
Then write down what will end the count, and write it before anyone picks up the reader. "Two sweeps of the aisle, then whatever is still missing goes on a list with a name against it" is a stop condition. "We keep going until we find everything" is not, and it is how a two hour job quietly eats a day.
The four steps
- Scope it. On Spot Checks, click New Spot Check, give it a title, and choose the scope, either one location or the whole warehouse. The expected list is built from the registry at that moment and the check sits as Pending.
- Dispatch it. Open the check and click Dispatch to Device. Pick the AZH-P1 handheld, assign it to a user, and set the task expiry, twenty four hours by default. One habit to build early: the handheld does not switch to a new task on its own, so whoever is holding it refreshes the task list and opens the check.
- Sweep it. Tap Start Scan and walk. Reads stream in and sort themselves into matched, missing and unexpected while you move. Walk slower than feels necessary, cover both sides of an aisle, and move the reader through an arc rather than pointing it straight ahead, because what fails to answer on the first pass is usually a tag lying at an angle the field never reached. There is a Power setting in dBm if you need to reach further or tighten the field, and it is worth changing one variable at a time rather than turning everything up at the first disappointment. Tap Complete when you are done and the result syncs back.
- Reconcile it. In the web app the check reads Completed, or Completed (incomplete) if anything is still missing, with the breakdown across expected, scanned, confirmed, missing, unexpected and coverage, plus an item level list you can filter.
Reading the result without over reading it
| Bucket | What it proves | What it does not prove |
|---|---|---|
| Confirmed | The tag answered a reader inside the scope during your sweep | That the item is in the right bin, in one piece, or where the record says |
| Missing | The tag did not answer during this sweep | That the item is gone |
| Unexpected | A tag answered here that the registry did not place here | That somebody mis-shelved it, it may be unbound stock, a neighbour's item, or a read from just outside your scope |
Coverage deserves the same care. It is a property of the whole system, the tags you chose, where they sit, what the room is made of and how the person walked, rather than a specification you can buy. The handheld's datasheet figure of 1300 or more tags per second is a maximum measured under favourable conditions; it is not a promise about a steel rack, and no honest reading of a first count should lean on it.
Working the missing list
Missing means one thing only: not read. Everything else is a hypothesis, and they are worth testing in order of what they cost you to check.
- The record is wrong. Wrong location, stale location, or a location that was renamed when the shelving changed. On a first count this is the cheapest to check and the most likely to be worth checking first.
- The item is legitimately elsewhere. Out on loan, in a van, at the repair bench. If borrowing runs through a workstation, Asset Basic already knows whose hands it is in, and an item on loan is not a discrepancy at all.
- The tag never had a chance. Flat against a steel surface, inside a metal drawer, behind a full drum, or buried in the middle of a dense stack. This is physics rather than paperwork, and it has an article of its own.
- The tag was never bound, or bound to the wrong asset. Look for its partner in the unexpected column.
- It is actually gone. Real, and worth taking seriously, but it belongs at the bottom of the list rather than the top.
The order is the advice. Only the last one costs you a search. The others cost a database query, a phone call, or a look at how the tag is fixed on.
The second sweep, and knowing when to stop
Walking the same aisle again will usually find some of what the first pass missed, because you approach from a different angle and the tag that was flat against a shelf edge gets a better look at the field. That is a genuine gain, and it is also a curve that flattens fast.
The signal to stop is a pattern rather than a number. If the same items come back missing on both sweeps and they have something physical in common, all steel, all in the same closed drawer, all at the bottom of the same stack, then more walking will not help. You are looking at a tagging problem wearing the costume of a counting problem, and the fix is the tag, its standoff or its placement, not another lap of the aisle.
Watch the unexpected column on the second pass too. If it grows, you may simply be drifting into the next bay and reading your neighbour's shelves, which is a scoping lesson rather than a discovery.
What to do with what is left
Three routes out, and the software deliberately leaves the decision with a person.
Create a follow up check for the residue, which turns an open ended argument into a short second task with its own scope.
Locate an individual item from its missing row. That sends a single asset to the handheld and guides you in by signal strength, with an LED pulse for tags that have one. Signal strength behaves like a compass that occasionally lies rather than a tape measure, and the full walk through of that is in our article on where an asset actually is.
Or simply write it down. Statuses exist for available, damaged, missing, lost and retired, but promoting something from missing to lost is a judgement with money attached, so a named human should make that call against a written rule. Whatever you decide lands in the reports, spot check history, per asset coverage with a last seen date, locate history, all exportable as CSV, which is what turns one afternoon's count into a trend you can point at next quarter.
Where this sits in TRAKON
The most useful thing a first count produces is not the coverage figure, it is the shape of the failures. A missing list scattered across categories, rooms and tag types reads as ordinary data drift. A missing list where the entries are all steel, all in the same rack, all wearing labels from the same roll, is a physical finding, and you can only see it because the check recorded every EPC rather than a total.
That is the argument for running the first check on the reader you actually intend to use, in the room you actually intend to count, before you buy tags in quantity. Count Basic comes free with the hardware and covers 200 assets and 3 users, which is small enough that nobody has to justify a pilot and large enough to count a real store room. If it turns out your problem is a barcode problem, or a process problem, we would rather you found that out in week one, and the comparison with barcode is written for exactly that moment. A longer note on getting the initial inventory right sits on rfidsolution.com.
After the first count
The second count is the one that starts measuring your inventory, because the first one spent itself fixing your data. That is the sequence working correctly, and it is the reason a small check you run every week beats a heroic full site count you run every year and then argue about for a fortnight.
Keep the scope small, keep the cadence boring, and let the reports accumulate. When somebody asks six months from now whether the system is working, the answer worth having is a row of counts, each one cheap enough that nobody had to be talked into running it, rather than one impressive percentage from a good day.
TRAKON is built and supported by ACCUZ® Industries.