Print and encode RFID asset labels on a Zebra printer, straight from TRAKON

TRAKON drives an RFID-capable Zebra label printer directly. At registration you choose Print & Bind, and one print job runs the whole chain: it prints the label face, writes the EPC into the chip if you asked it to, reads the chip back, and binds the EPC it actually read to the asset record. One label, one job, one asset, verified in the same pass.
Three questions people ask before believing that, answered plainly. Can an ordinary barcode printer write RFID? No, printing ink and writing a chip are done by different hardware. Can any Zebra printer encode? No, the RFID encoder is a factory option, not firmware. Does the software you already run matter? Yes, because a chip that gets written but never verified, or verified but never bound to a record, is where self-printed labels quietly go wrong.
A printer and an encoder, sharing one shell
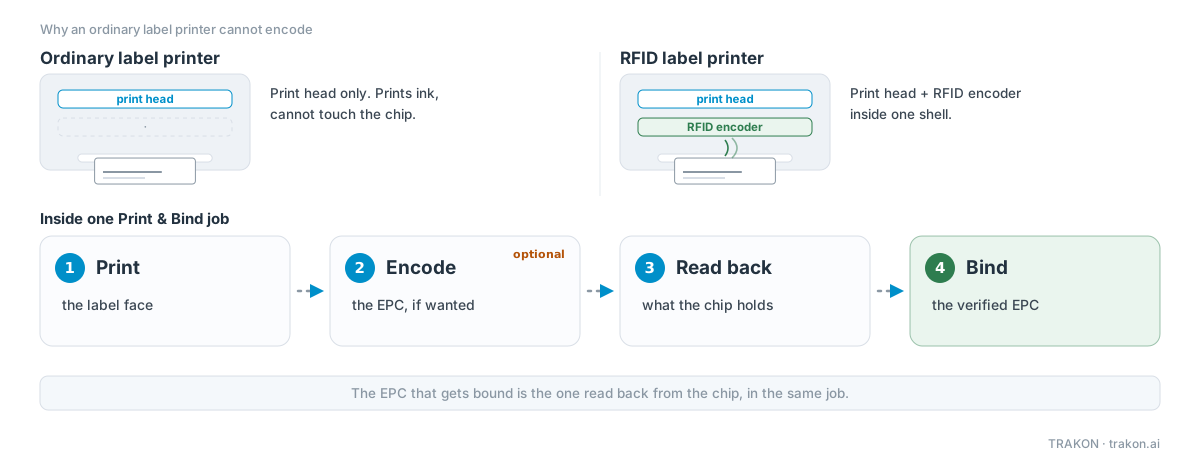
A label printer puts ink on paper with a thermal print head. An RFID label printer carries a second, unrelated instrument inside the same shell: a short-range radio that wakes the chip embedded in the label stock and writes to its memory while the label travels through. The two never touch. The print head cannot reach the chip, and the encoder cannot make a mark on the paper.
That is why the answer to "can my barcode printer do RFID if I buy the right labels" is no, at any price. Feeding RFID label stock through an ordinary printer produces a perfectly readable printed label whose chip still contains whatever it contained on the roll. The printed text and the silicon are two separate records, and nothing has connected them. What a barcode actually is, and what the chip adds over it, is the subject of an earlier article.
Inside one Print & Bind job
When you click Print & Bind in TRAKON's bind dialog, the Bridge assembles a single ZPL job for the printer. ZPL is Zebra's public label language, and its RFID commands are documented in Zebra's own RFID Programming Guide. The job carries up to three instructions:
- Print the face. The asset's code and name, rendered from the label template.
- Write the chip, only when encoding is wanted: the EPC goes into tag memory while the label passes the encoder.
- Read the chip back, and report. The printer reads what the chip in this label actually contains and returns it to the software.
The EPC that ends up bound to the asset is the one from step three. Not the one in the template, not the one the write command intended, the one the chip answered with. Writes can fail, stock can surprise you, and the only version of the number worth trusting is the one read back off the silicon after everything else has happened.
Why the read-back rides in the same job
A printer is a machine that advances labels. If printing and verifying were two separate jobs, there is nothing to stop a label from moving between them, and the chip being read would belong to the next label on the roll, not the one just printed. Everything looks fine on screen, and the asset is bound to a tag that is still sitting on the roll, about to be stuck on something else.
Keeping print, write and read-back inside one job removes that whole class of mistakes by construction rather than by care. The number that comes back belongs to the label that just came out, because the job never let go of it in between. This is the practical meaning of "bind in one step", and it is the part you cannot reproduce by printing labels first and scanning them into the system afterwards, however carefully.
The connection type, and what it decides
In the Bridge setup, enabling the Zebra printer offers a Printer Connection choice: USB print only, TCP/IP Print & Bind, or USB P&B. The split is not product tiering, it follows from the cable.
A standard Windows USB print queue is a one-way street. The computer can push a job to the printer, and nothing structured comes back. That is fine for printing, and it is exactly the read-back path that Print & Bind depends on, so over a plain USB queue the honest label for the feature is print only. The network connection (ZPL over TCP, port 9100 in the setup example) is a two-way conversation: the job goes out, the verified EPC comes back on the same channel. A USB Print & Bind mode exists for desks that cannot get a network drop, but if you are setting up fresh and want the full chain, run the network cable. It is the difference between a printer you talk to and a printer you only talk at.
Print success and bind success are different results
The read-back step can come back empty. A dead chip on the roll, the wrong stock loaded, or a printer whose RFID calibration has not been run for this label type, and the paper still comes out looking perfect. TRAKON treats that as a failed bind, because it is one: there is now a printed label in the world with no verified chip behind it. The label goes in the bin, the record stays unbound, and you print again.
That strictness is the feature. The failure mode it prevents, a label that looks right, sticks on fine, and is bound to nothing or to the wrong record, is invisible on the day it happens and expensive on the day a count exposes it, usually as a missing asset that is sitting in plain sight. One practical habit keeps this rare: when you load a different label stock, run the printer's RFID calibration, because the encoder needs to learn where the chip sits on the new stock before it can write or verify reliably.
Most sites never encode at all
Here is the part vendors rarely lead with: the write step is optional, and most deployments skip it. ACCUZ® labels ship pre-encoded, each chip already carrying its EPC from the factory. Binding then means reading the number that is already there and attaching it to an asset record, which you can do two ways at the desk. Place the label on the AZD-R1 desktop reader and the EPC fills into the bind dialog. Or run Print & Bind with pre-encoded stock, in which case the printer prints the human-readable face and reads the chip in the same pass, no write step, and the face and the chip are guaranteed to describe the same label.
For tracking your own assets, that is usually all the numbering you need. The EPC's job is to be unique and to be bound; the meaning, code, name, category, location, lives in the database. You do not need a GS1 company prefix or a numbering standard to track your own tools, and adopting one for internal tracking adds ceremony without adding information.
Encoding earns its place when the number itself must carry your meaning: an EPC that embeds your ERP asset code, re-tagging where a replacement chip must receive a specific value, or blank bulk stock that arrives with no useful numbers at all. Then the write step runs first, and the read-back still gates the bind, so a failed write cannot slip a wrong number into the register.
What this looks like in TRAKON
Printer setup lives in the Bridge, the same place the desktop reader is configured: tick Enable Zebra RFID label printer, choose the connection, and for TCP/IP enter the printer's IP and port. After that the printer simply appears as a third way to bind. On the Assets page, Bind Tag opens a dialog with three tabs, Manual Input, Scan from Reader and Print & Bind, and the flow is the same in Asset Basic and Count Basic. An asset that is already bound keeps a Print Label action on its detail panel, for the day the label on the physical item gets scuffed past reading and needs a reprint.
What you need at the desk: a Zebra printer with the RFID option installed, speaking ZPL, reachable from the PC that runs the Bridge, ideally over the network. On the label side, stock whose inlay position your printer can calibrate to, and if your assets are steel, the label conversation from the on-metal article applies to printed labels exactly as it does to pre-printed ones.
Before you order a printer
Work the question backwards from the labels. If pre-encoded stock covers you, and for plain internal asset tracking it usually does, then the printer's job shrinks to printing faces and verifying chips, and a desk that binds on the AZD-R1 may not need a printer at all. If you do need encoding, check three things: that the specific model on the quote has the RFID option and not just the word Zebra on the front, that the bind desk can get a network drop, and that the label stock you plan to run is one the printer can calibrate to.
If a Zebra RFID printer is already sitting in your operation, TRAKON talks to it in its native language, and turning it on is a checkbox in the Bridge, not a project.
TRAKON is built and supported by ACCUZ® Industries.